Wednesday, July 30, 2014

Gallery of Rusty Stuff Artwork

ABOUT RUSTY STUFF

There came a point in time on my daily walks in the high desert that I could no longer walk past all the wonderful Rusty Stuff I saw along the roadways and irrigation ditches.  I starting taking a canvas bag with me on my walks and started hauling home rusty stuff with me.  I started creating mini installations in my garden areas and randomly nailing some of it to wood blocks. 


Here is one of Thomas Hogan's birdhouses that I mounted atop a leftover piece of a tapered post on top of a leftover piece of 8x8"   This birdhouse is about 8 years old --  Thomas' newer work is much more elaborate and colorful.  If you want to take a look at his current birdhouses -- his website is www.newmexicobirdhouses.com
 

Here's a close-up of the post and the 8x8 -- I think I'm probably finished nailing things to the 8x8, but the post is still a little bare and as I find just the right things to add, I'll nail them on.  
 
 
And this is a the area where the birdhouse lives along with the wonderful rusty lizard I bought at a yard sale for fifty cents!  I toss mostly rusty round things into this area.  And I created the walkway from firebrick that I found buried in my back yard!


Then, there came the time that I had hauled home waaaaaaaaaaaaay too much rusty stuff and decided that I needed to open an Etsy shop and share my New Mexico Rusty Stuff with artists who didn't have as much access to it as we do here in New Mexico.  After all, one of the best things about life is creating as many win/win situations as possible!  I get to take my walks and clean up the environment and share the goodies!  And I think I must have saved thousands of flat tires by picking up rusty nails.

I opened my Etsy shop in 2008 and over the years I've mailed rusty stuff not only all over the United States, but all over the world.  It amazes me that rust actually makes it through Customs!

I thought it would be fun to ask the artists who have been using my Rusty Stuff to send me photos of what they have been creating so that I could post photographs of their artwork on my blog.  So, this post is the beginning of a gallery of Rusty Stuff Artwork.   As I continue to receive photos, I'll keep updating this post.  I hope you enjoy taking a look at how other artists have used my Rusty Stuff. 

And if you haven't visited my Rusty Stuff shop on Etsy -- the name of the shop is simply "pvcatalina"


GALLERY


Valerie Hibbard is a prolific mixed media artist in Ohio and her work can be viewed on her website at sculpture.plainandpractical.com/

Below are a few of her mixed media wall pieces which incorporate found metal objects from my Etsy shop:


Here is Keely of Southern California who purchased rusty bottle caps from my shop to use to embellish her wonderful vessels.  Aren't they just absolutely glorious!!


Lisa from Alabama has created crosses using rusty nails purchased in my shop -- she uses the crosses on decorative items to either be laid on table or hung on wall. She'll be selling the items at a Christmas shop in which she participates in November in Birmingham, Alabama.


Here is June's wind chime mobile entitled "Aspen" in which she used rusty wires from my shop.  The wires make great branches!


Jordan from Michigan used semi-rusty bottle caps from my shop in her large free-standing bifold mixed media assemblage:


More photos to be added!!


Sunday, June 1, 2014

Whimsical DIY Hummingbird Feeder

This post fulfills my promise to those of you I told I'd put together some instructions for making my whimsical DIY hummingbird feeders.

After having had a hummingbird nest on my back portal during the summer of 2013, I decided to beef up my chances of having a nest again this year by attracting more hummies by having more hummingbird feeders.   Logical??

Here is the nest from last year -- you can see one little baby beak pointing off to the left.

 
Here's one of my completed DIY Hummingbird Feeders:
 
 
Because I had a wonderful handcrafted welded hummingbird feeder from about 20 years ago on which the rubber feeder tip had dried out, I started looking for replacement tubes/tips for feeders and finally found them (where else but) on Amazon.com.


Rather than just buy one tip, I decided to buy a dozen (a better deal!)

I started experimenting with different size/shapes bottles and discovered that the 11 oz. soda/drink bottles work best.  The size has something to do with the creation of the vacuum inside the bottle.

Here's everything you'll need:


Clean empty clear 11 oz.drink bottle, round-nose pliers, feeder tube, dowel or substitute, glass bubbles or marbles, 16-18 gauge craft or galvy wire --  I use about 5-6 yards for each feeder.  Don't use brass -- I discovered it is waaaaaaaaaay too stiff. 


Start making the wire cage on the bottle.  This is all so random that I didn't keep track of lengths of wire, because you can always splice in more or cut off what you don't need.  And each bottle I made, I wrapped in a different manner.  Just make sure your wrapping secures the bottle within the wire cage.

Wrap a length of wire round the neck of the bottle -- you can leave "arms" of wire to later add glass bubbles to the end of the arm.  You can run the wire down to the middle of the bottle and wrap around loop around the middle of the bottle.    I approach this kind of like I were putting ribbon on a package.

Attach a new wire to the wire on the neck of the bottle, send it down the bottle vertically, wrapping the wire around the middle wire, then down and across the bottom of the bottle, and  up the other side, wrapping around the middle wire, then up to the neck wire. 

To make the springy "blossoms" to attach to the wire cage on the feeder, cut 2' of wire


 and use your round tip pliers to make a coil at the end
then place the coil against the bubble and start randomly wrapping the wire around the bubble until you know it can't escape from the wire


wrap the remainder of the straight part of the wire around a dowel to make a spring
 
then add the spring to the wire cage on the bottle. 


You'll find that the hummies will be attracted to the sun hitting the glass bubbles -- they'll explore the bubbles after you first hang the feeder, but they immediately learn where the feeder tube is and subsequently ignore the bubbles.  I've read that it is an old wives' tale that hummies are attracted to red -- what they are attracted to tends to be the color of the flower in nature that is currently in bloom, or the color of the bloom on which they last fed.

On the crossed wires at the bottom of the bottle add a wire loop as a hanger.

Now you're ready to fill the bottle with nectar and insert the feeder tube.

I had a LOT of trouble at first with my DIY feeders leaking nectar.  I put up a question on Amazon.com about the feeder tubes and got about 30 responses -- all the way from "the feeder tubes suck" to detailed instructions what each person did to make the nectar not drip out.

Here's what I found works for me:

(1)  Don't hang the feeder where it is in a lot of wind -- the wind will disturb the vacuum in the bottle and the nectar will leak out.

(2)  Always start by filling the bottle FULL of nectar.  You need to do this to create a good vacuum inside the bottle.

(3)  Here's the extremely weird part -- and this really works -- it is something I came up with on my own:  After you have the nectar in the bottle, insert the stopper and keeping the bottle "upright," take it with you to wherever you are going to hang the bottle.  Now turn the bottle on its side so it is parallel to the earth.  Suck on the feeder tube as if you were sucking a straw.  Allow your tongue to catch the suction and "stop" the feeding tube.  Don't lose the suction, keeping your tongue on the end of the feeder tube, and gently turn the bottle so it is vertical.  Release your tongue and the suction.    You should have created a perfect vacuum in the bottle, and there should be no bubbles in the feeder tube.  If there is a small bubble in the tube, I flick the feeder tube with my finger and the bubble usually rises to the top of the bottle.  (This is a time where I wish Dr. Sheldon Cooper from the Big Bang Theory were my next door neighbor and he could explain all this vacuum stuff to me!)  If you didn't create a good bubble-less suction, just tip the bottle to parallel with the earth and start again.  When you've got good bubble-less suction, hang your feeder!

Alas, my strategy of adding more feeders didn't work and I was not blessed with another nest on my back portal this year, but based on the amount of nectar I am making, I am feeding a lot more hummingbirds this year!

Here's one of the freshly fledged hummie babies from last year:


Wednesday, March 26, 2014

2014 Little House

This year the Albuquirky House Tour sponsored by OFFCenter will be held on Saturday, May 3.  For those of you who aren't familiar with OFFCenter, you can read about the center and the house tour at http://offcenterarts.org/  

In connection with the house tour, one of OFFCenter's  main fundraising events -- the Little House Silent Auction -- will be held at the Summer and Dene gallery on Friday evening, May 2.

Here's the description of the Silent Auction from OFFCenter's website:

The Friday night before the Albuquirky House Tour, our "Little Houses" Silent Auction will astound you with the variety of creative approaches over 125 established and emerging artists have taken with the meaning of "home." Artists donating "Little Houses" for past auctions have included Frank McCulloch, Angus MacPherson, Stephanie Lerma, Melody Mock, Maria Moya and more! Come see who will donate a unique, quirky "Little House" this year for you to take home! Will be held at Sumner & Dene Creations in Art during Frank McCulloch’s opening reception for his solo exhibit on First Friday ARTSCrawl. For more info call OFFCenter at (505) 247-1172 or Sumner & Dene at (505) 842-1400.

Each year OFFCenter provides local artists with "blank" little houses made from wood scrap, and each artist decorates/embellishes a house to donate to the fundraising silent auction.  (Artists are not limited to using the blank wood houses and create some amazing and wonderful houses!!)

For the past 5 years or so I have contributed a little house to the silent auction. (My creations from past years can be viewed in my March 27, 2013 blog post.)

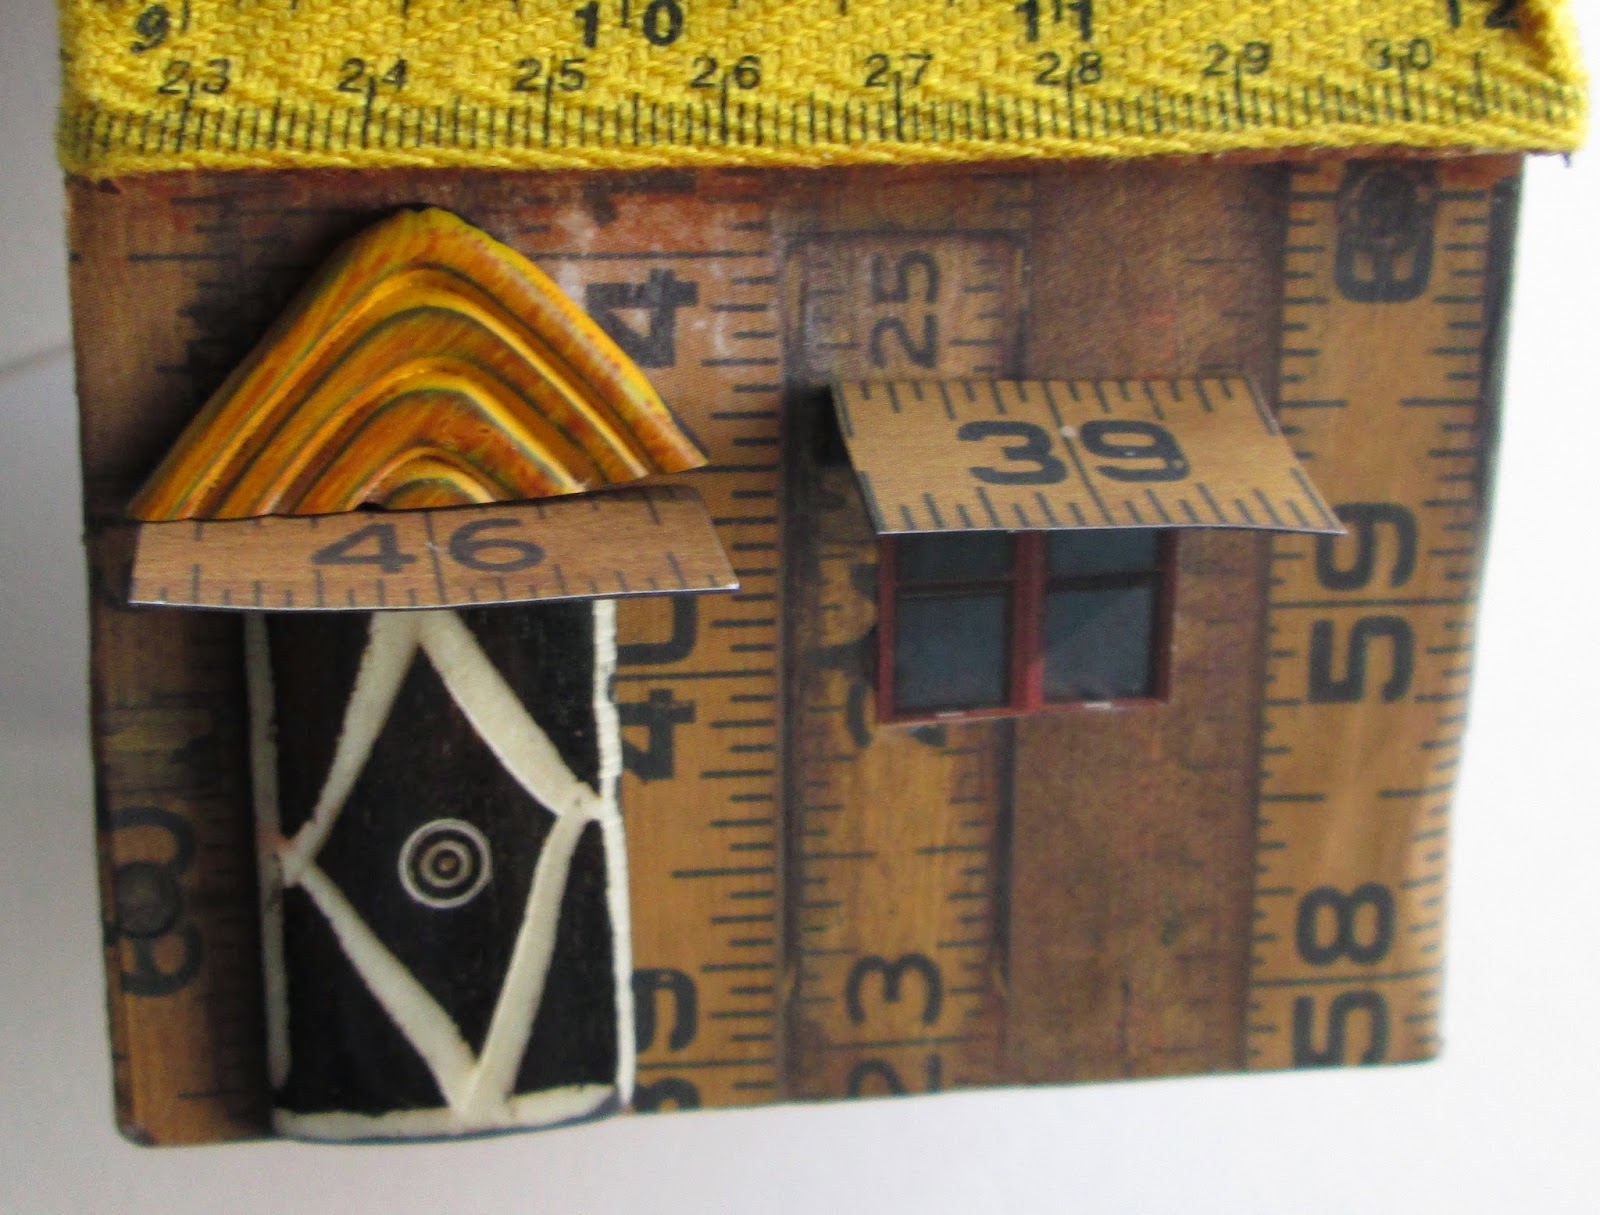
This year, my little house started with the idea that I wanted to "side" the house with paper that features old wooden rules.  In my ribbon stash I had some yellow cotton ribbon that looks like the tapes in the metal retractable measuring tapes -- I wanted to use this for the gutters on the house.  And, for a not-so-subtle play on words, I ended up naming this piece "House Rules."


The attic window is created from tiny little bamboo sticks.


I thought maybe I'd roof the house with little wood shingles, but I so loved the button roof on my house from last year, and I have so darn many buttons, I decided to create another button roof.


The door on the house is a large rectangular bone link from a bracelet.  The archway above the door  is a broken earring that I found in my junk jewelry stash.


* * * * *

Three of my co-workers at Papers! also created Little Houses for this year's auction.  I asked each one of them to send me photos of their houses so I could include them in this blog post.
 
First is Madeleine Havas' black and white creation:


The black paper that Madeleine used to cover her wood form is a handmade paper with embedded strings.  She cut windows into the paper using the lines created by the embedded strings as cutting lines.  Behind the windows she inserted portions of a cotton paper from India that we employees at the store called "Paparazzi Paper" because it had images of faces that could be famous people.  Madeleine said that she wanted the overall impression of the house to be "sinister."
 
Next is Janice Gabel's Little House:
 
 
Janice used one of the smaller forms provided by OffCenter -- the main part of the house is made from a length of a wood 2x2", whereas the two houses above were constructed from 4x4" forms.  Janice is both a calligrapher and member of Albuquerque's book arts group Escribiente, and incorporated both of those talents into her Little House by adding an accordion style book with calligraphy to one side of the house.


Suzanne Marshall made two Little  Houses this year:
 
 
The first house is a collaged  "Skinny House" made on a flat base ( size-wise I would guess this piece is about 8-1/2" x 11").  Definitely a house that could fit into a skinny urban lot! 

 
And Suzanne's second whimsical house was made using another of the small wood 2x2" bases and features a hoe foot and a side 4" fan. 
 

* * * * *

As a postscript to this blog post -- OffCenter just reported that both the House Tour and Little House Auction were huge successes and raised over $11,000 which will go directly toward supporting OffCenter's ongoing community arts programming.